The final mile of AI content creation: i-Magic3D!
Once AI solves the most challenging problem of 3D content creation, i-Magic3D will solve the problem of "Glasses-Free 3D Display"!
Comparison of "Glasses-Free 3D Display" Solutions::
Traditional Solution |
i-Magic3D Solution | |
| Hardware Cost | Expensive dedicated 3D displays need to be purchased. | Laptops, tablets, mobile phones, ... + inexpensive lenticular lens sheet (DIY) |
| Software Cost | Interlacing, DIBR and MP4 creation software need to be purchased. | Built-in Interlacing, DIBR and MP4 creation functions |
Content Restrictions |
Requires a specific format or dedicated 3D playback software. | Standard MP4 format, playable on any device. |
| Adaptability | Bind to a specific LPI lenticular lens and panel resolution | Supports any commercially available LPI lenticular lens and panel resolution. |
| Visual Experience | With few viewpoints (4-9), it's easy to feel disjointed. | 100+ viewpoints, smooth hologram-like effect |
| Efficiency | Processing is slow and makes it difficult to generate high-quality image sequences. | CUDA accelerates DIBR, efficiently processing large numbers of views. |
Build your first "Glasses-Free 3D Display":
Step 1
- Prepare 3D lenticular lens:
- 20LPI ~ 50LPI (25LPI with 4mm of thickness available in markets is highly recommended for 15.6" ~ 24" 2K display.)
- Thickness > 1mm; The thicker 3D lens, the better 3D depth is.
- Hologram Effect: 25LPI ~ 40LPI、AMOLED/OLED/LCD panel of larger than 300 PPI, or 20LPI ~ 25LPI, 15.6" (or smaller) AMOLED/OLED/LCD panel with 3840x2160 (or higher) resolution
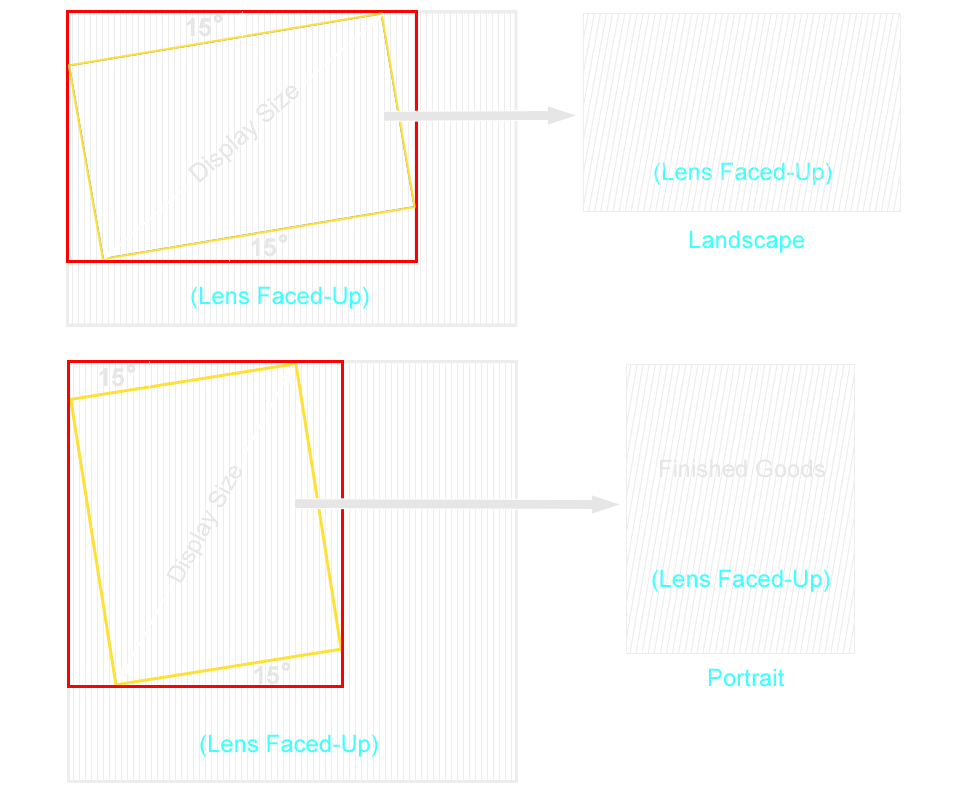
- According to AMOLED/OLED/LCD display size, cut out the 3D lens at slanted angle of 15 degrees (or other slanted angles) as follows.
Step 2
- Choose AMOLED/OLED/LCD Panels (Any Size, Any Resolution):
- AMOLED/OLED/LCD Monitor
- Laptop PC
- Tablet PC
- Smart Phone
- Others

Step 3
Choose an appropriate RGB arrangement:
- AMOLED/OLED Diamond Pentile
- Most of the display panels of high-end mobile phones, iPhones (iPhone X and above) and high-end laptops on the market currently use Diamond Pentile format or similar arrangement formats.
- Most of the display panels of high-end mobile phones, iPhones (iPhone X and above) and high-end laptops on the market currently use Diamond Pentile format or similar arrangement formats.

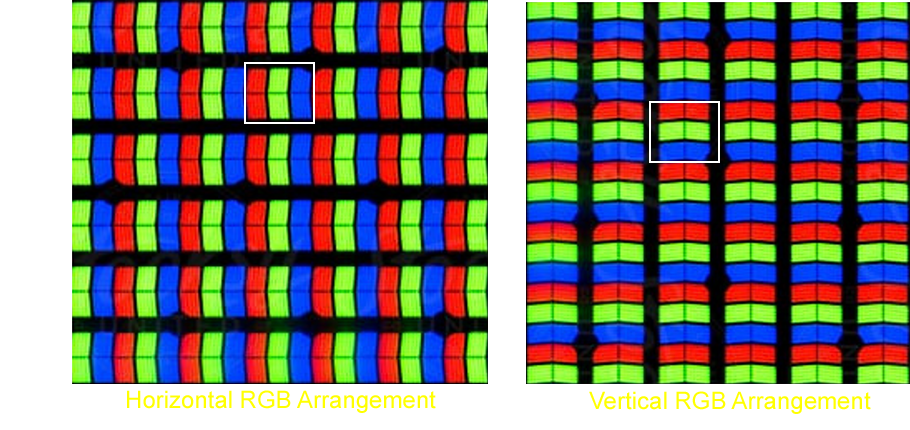
- LCD RGB Sub-Pixel
- The RGB sub-pixel arrangement of most LCD screens currently on the market for laptops, monitors, and mobile phones adopts the standard RGB (Red, Green, Blue) horizontal (or vertical) arrangement.
- Depending on your needs, you can choose a horizontal RGB arrangement for landscape or a vertical RGB arrangement for portrait; on contrary, generally mobile phones use a horizontal RGB arrangement for portrait, vertical RGB arrangement for landscape.
- The RGB sub-pixel arrangement of most LCD screens currently on the market for laptops, monitors, and mobile phones adopts the standard RGB (Red, Green, Blue) horizontal (or vertical) arrangement.
Step 4
- Later on, you can directly interweave (or interlace) the multi-view images into a synthesized 3D image to preview 3D effects by help of i-Magic3D" (Trial Version: Link1 Link2 Link3).
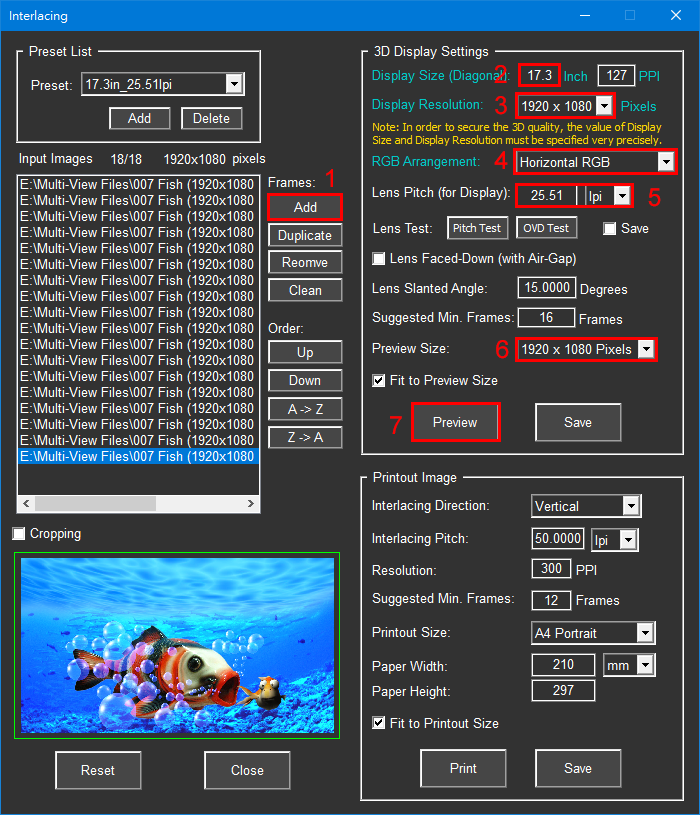
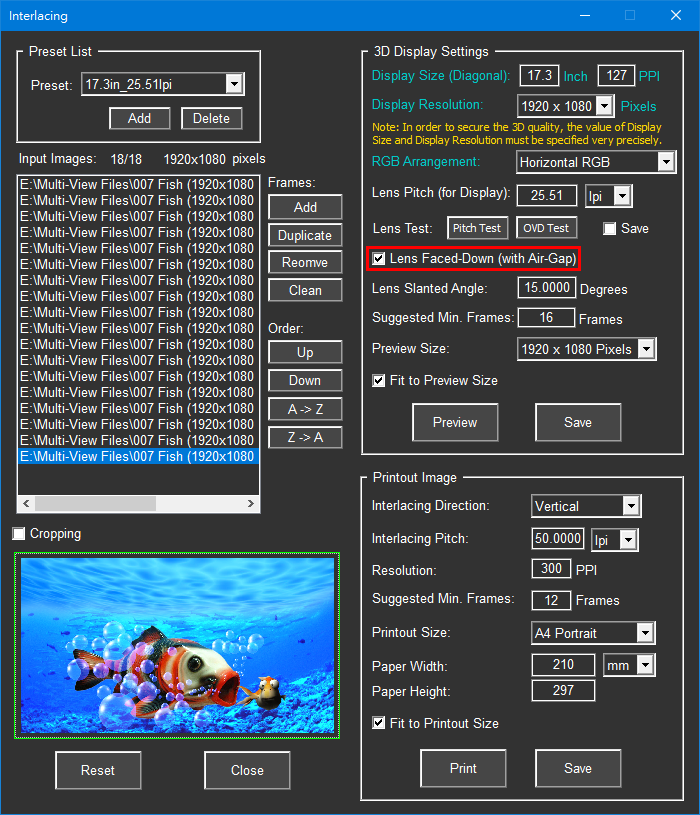
- With i-Magic3D's "Interlacing", you just need to ...
1. Add in multi-view images.
Note: "Multi-View Images" can be obtained from DIBR (Depth Image Based Rendering).
2. Fill in the "Display Size". It must be very precise. Please refer to its technical spec.
3. Choose the "Display Resolution". This is the native resolution of AMOLED/OLED/LCD panel.
4. Choose the "RGB Arrangement". Mostly, it would be "Horizontal RGB".
5. Fill in the "Lens Pitch" of 3D lenticular lens. You may use the "Pitch Test" as below to verify it.
Note: If necessary, you can also adjust "Lens Slanted Angle" below to meet the 3D lenticular lens.
6. Choose the "Preview Size".
7. View the synthesized 3D image on the AMOLED/OLED/LCD panel with the 3D lens you just prepared.
Step 5
- Attaching the 3D lenticular lens to the display panel (two methods):
Note:
Before installing the 3D lenticular lens, please make sure that there is no Anti-Reflective film, protective film, etc. on the AMOLED/OLED/LCD panel to avoid causing the 3D lenticular lens to lose focus.
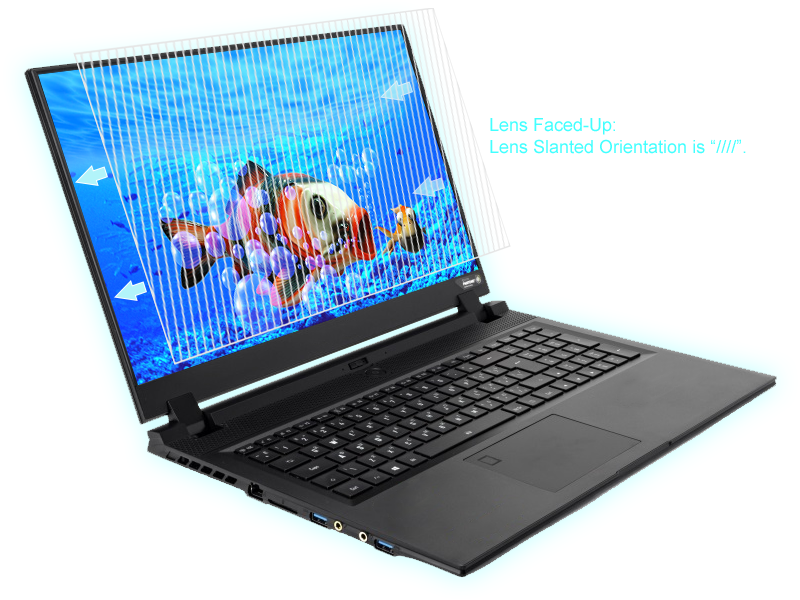
- Lens Faced-Up:
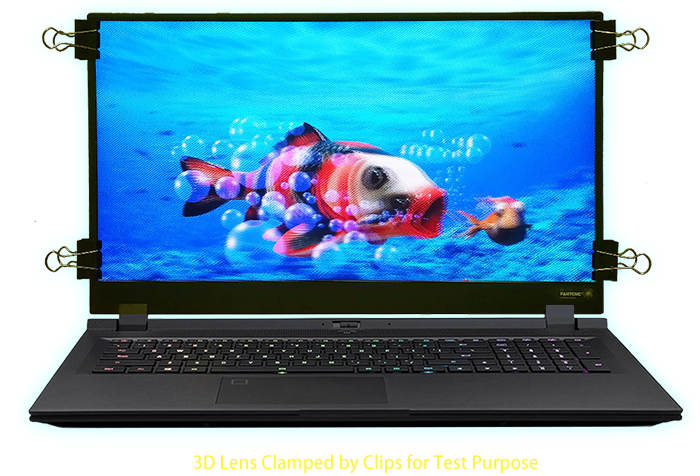
Most of case, put the lens side of the 3D lenticular lens up and attach it closely on the AMOLED/OLED/LCD panel. If it is just for testing purposes, you can temporarily use stationery clips to clamp the four corners of the 3D lenticular lens for use.

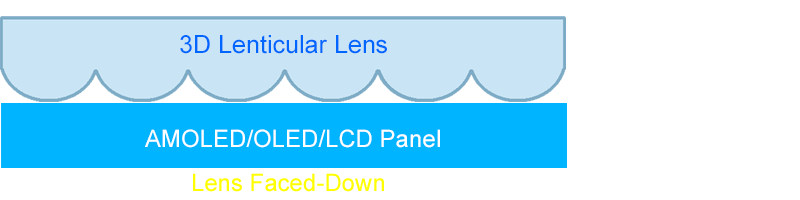
- Lens Faced-Down with Air Gap:
If a clear 3D image cannot be obtained using the "Lens Faced-Up" method, this method must be used: Flip the original 3D lenticular lens over so that is the "Lens Faced-Down". If a clear 3D image still cannot be obtained, then an "Air Gap" must be added between the display panel and the 3D lenticular lens.
Such an "Air Gap" MUST be little less than the thickness of 3D lenticular lens. It might need to be adjusted until it can get the best focus on your AMOLED/OLED/LCD panel.
Usage steps:
1. At first, place the lenticular lens faced-down the display panel to view 3D.
2. If a clear 3D image cannot be obtained, then add an "Air Gap" between the display panel and the 3D lenticular lens.
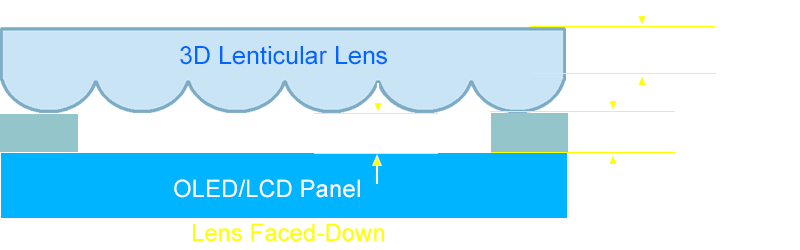
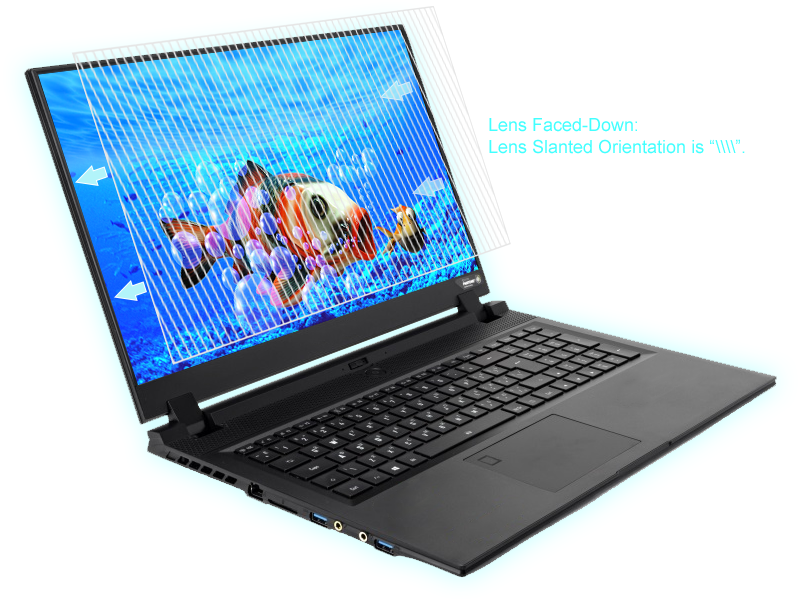
- Then, check "Lens Faced-Down (or Reversed Slanted Angle)" as follows.
- Lens Faced-Up:
Finally, let's take a look at the result ...
About i-Magic3D ...
- Supports RGB Sub-Pixel/Pixel Interweaving Algorithms for both glasses-free 3D display and 3D lenticular image printing.
- Supports "Preview on Display" before 3D image printing to secure 3D quality.
- Can save 3D images based on any AMOLED/OLED/LCD panel, any size and any resolution for a variety of 3D applications.
- Supports "Depth Image Based Rendering" for more than 100 frames of multi-view.
- Supports CUDA high-speed "Depth Image Based Rendering" and interlaced multi-view images.
- Supports batch processing of image sequence
- Supports the production of "interwoven images" of multi-view 3D MP4 videos, which can be directly played and displayed in "Glasses-Free 3D" on any AMOLED/OLED/LCD display, Android, and iPhone mobile phones without the need for special 3D playback software.
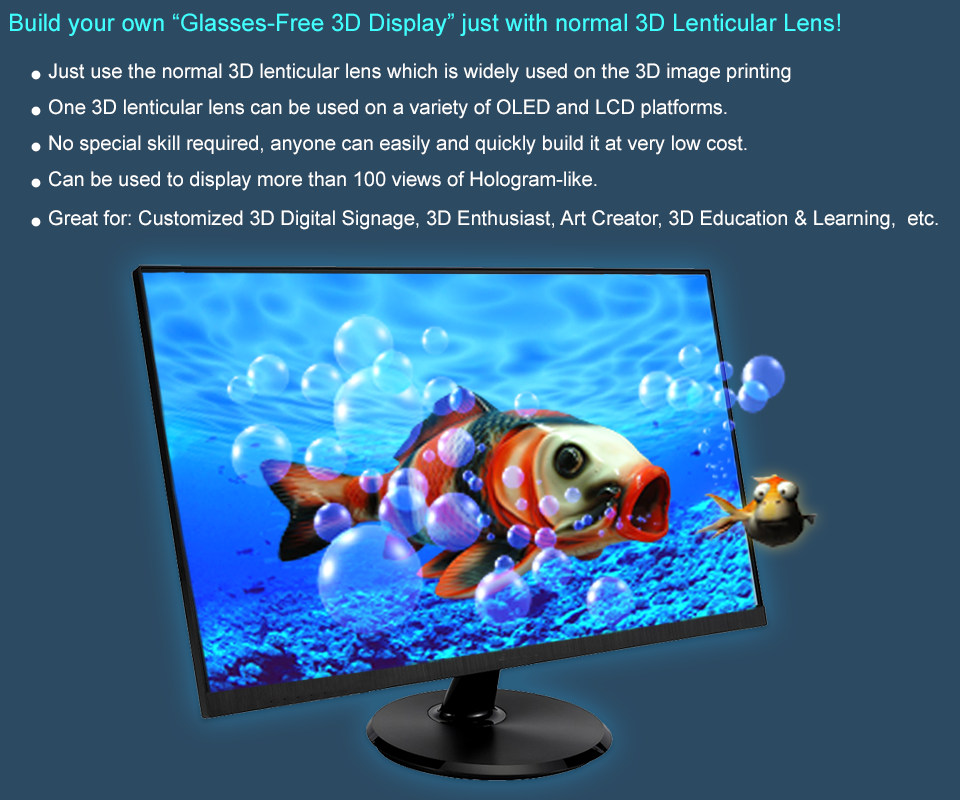
3D Lenticular lens is not only for 3D image printing but also can be used on AMOLED/OLED/LCD panel for "Glasses-Free 3D Display". As long as there are RGB sub-pixel and pixel based mapping, then anyone can easily interweave multi-view images into a synthesized 3D image to show it on any AMOLED/OLED/LCD panel. So, what you need is a solution to interweave your creative multi-view images in a 3D image format which can be shown on any AMOLED/OLED/LCD panel with any normal 3D lenticular lens.
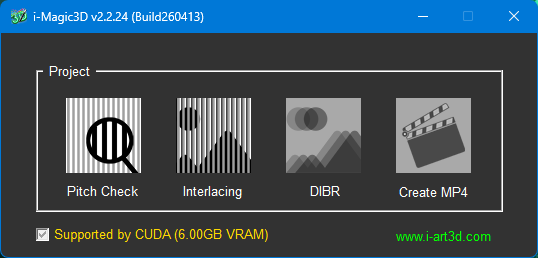
i-Magic3D is an integrated solution for 3D lenticular imaging application for both "Glasses-Free 3D Display" and "3D lenticular imaging prints". Essentially, it includes the following major functions:
- Pitch Check:
Based on the lens pitch, finds out the interweaving pitch for the color printer to be used.
- Interlacing:
Interweaves the multi-view images into different synthesized 3D images for "Glasses-Free 3D Display" and "lenticular 3D image printing" independently.
- DIBR (Depth Image Based Rendering):
- Can render the Depth Map into multi-view images of more than 100 views for Hologram-like display.
- Supports batch processing of image sequences for creating MP4 videos.
- Supports CUDA high-speed "Depth Image Based Rendering" and interlaced multi-view images.
- Create MP4:
The multi-view interlaced image sequence can be rendered into "Multi-View 3D" MP4 video, so that it can be directly played and displayed on any AMOLED/OLED/LCD panel, Android and iPhone mobile phones in "Glasses-Free 3D" display without the need for dedicated 3D playback software.- Solves the problem of reduced 3D resolution caused by "Multi-Tile" playback display.
- Solves the computing power problem of "2D+Depth" video real-time rendering and interlacing.
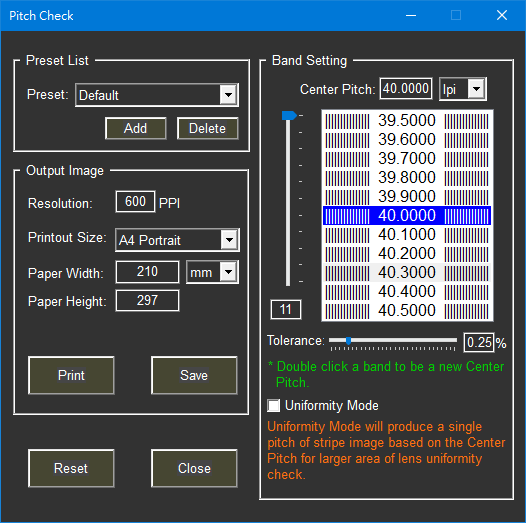
Pitch Check:
Before proceeding 3D lenticular image printing, we have to make sure the lenticular lens pitch to be matched with the color printer to obtain the best and most accurate printing quality.
Product Features:
- Find out the most accurate interlacing pitch for the 3D lens before printing.
- Supports automatic conversion between LPI and mm units.
- Supports the calibration of the optimized interweaving lens pitch for various "lenticular lens".
- There are no restrictions on lens pitch, output size and output DPI.
- Supports "Uniformity Mode" to test the lens quality.
- Tolerance can be set to facilitate calibration efficiency.
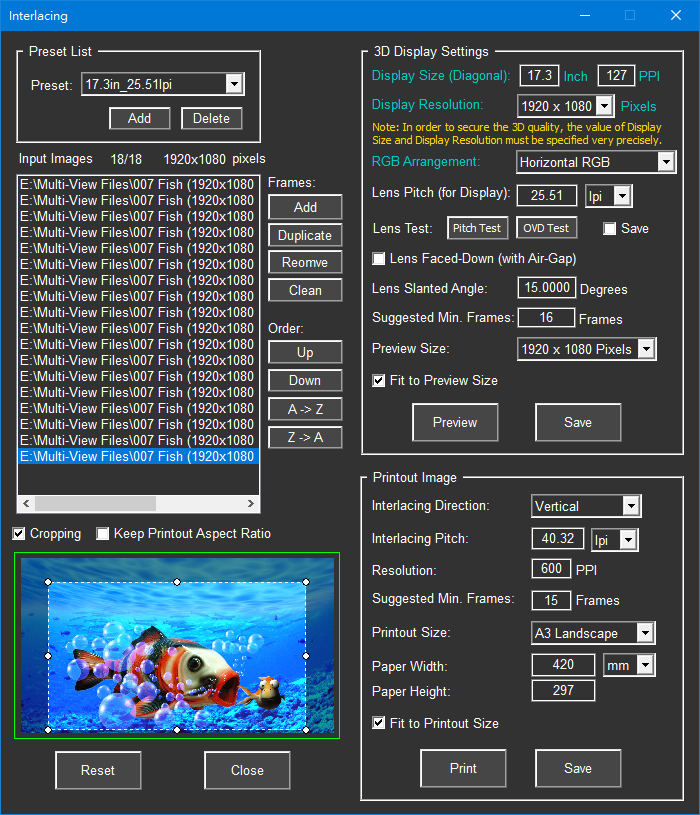
Interlacing:
Here, it can independently interweave the multi-view images into different synthesized 3D images for "Glasses-Free 3D Display" and "lenticular image printing". Before 3D image printing, you can preview the 3D effect on AMOLED/OLED/LCD panel to secure the 3D quality. Furthermore, you can also save the 3D images according to different AMOLED/OLED/LCD platforms of any display sizes and any display resolutions. Once you have these 3D images, you can use them for 3D signage, 3D visual art show, 3D slideshow with PowerPoint, or other players.
Notice:
1. Before "3D Display", please be sure to use "Pitch Test" to find out the most accurate lens pitch in advance. Note: The Lens Pitch (for Display) value and the "Interlacing Pitch" value for printing may be different for the same type of 3D lenticular lens.
2. If you'd like to use PowerPoint to play 3D images for slideshow, then the 3D images must be kept as full screen size to prevent them from being scaled by PowerPoint. That means the 3D images must be saved with "Display Resolution".
Product Features:
- Supports "RGB Sub-Pixel", "Pixel" based and AMOLED, "OLED Diamond Pentile" interweaving algorithms.
- Supports 3D slanted lens to eleminate the interference caused by "black matrix" and "moire" on 3D display.
- Supports any AMOLED/OLED/LCD panels, any sizes, any resolutions for "Preview" and "Save" 3D images.
- Supports any 3D lenticular lens available on the markets.
- Supports "Pitch Test" and "Optimal Viewing Distance Test" on AMOLED/OLED/LCD panel so to get more accurate interlacing pitchs.
- Supports adjusting the "Lens Slanted Angle" to ensure that the accuracy of the "Multi-View Interlacing" can fully adapt to the cutting angle of the 3D lenticular lens.
- Supports "Preview 3D" on AMOLED/OLED/LCD panel before printout to secure the 3D quaity.
- Supports "Cropping" to focus on ROI (Region of Interest).
- Supports unlimited frames of multi-view interweaving, depending on system configuration.
- Supports unlimited lens pitch and size, depending on system configuration..
- Supports unlimited printout size, depending on system configuration.
- Supports "Horizontal" and "Vertical" interweaving modes for printing.
- Supports "3D", "Flip" and "Motion" interweaving modes.
- Friendly user interface for intutive operation.
- Anyone can easily and quickly build his own "glasses-free' 3D display at very low cost
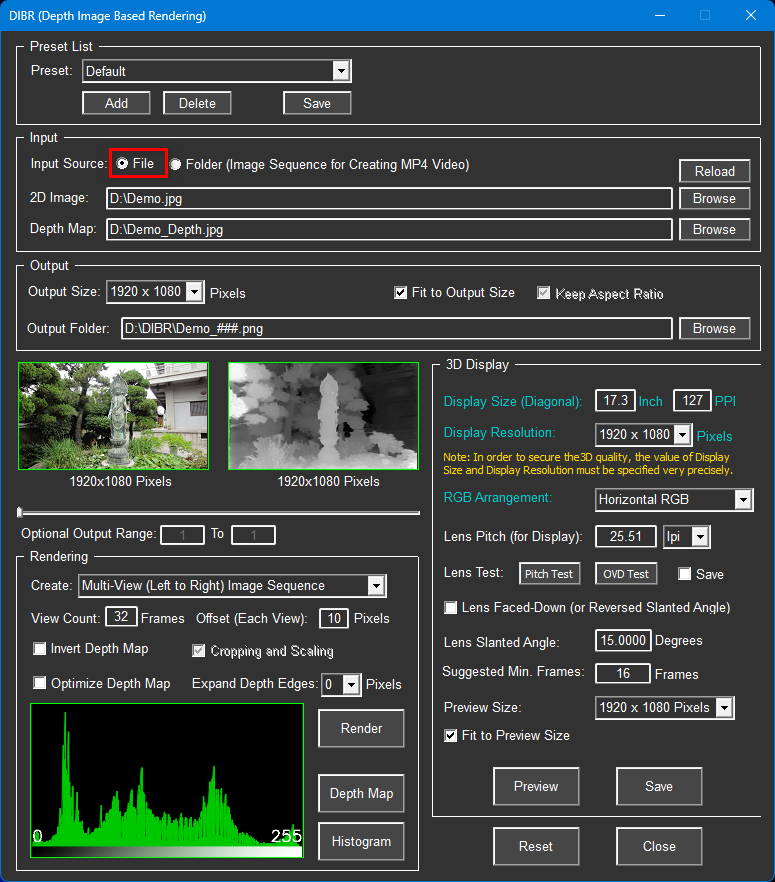
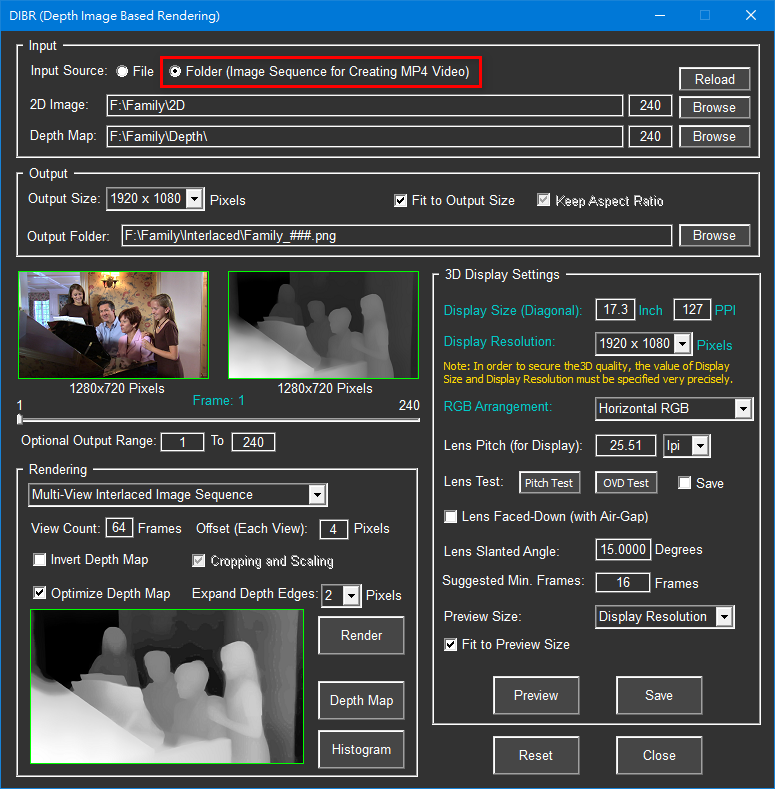
DIBR (Depth Image Based Rendering):
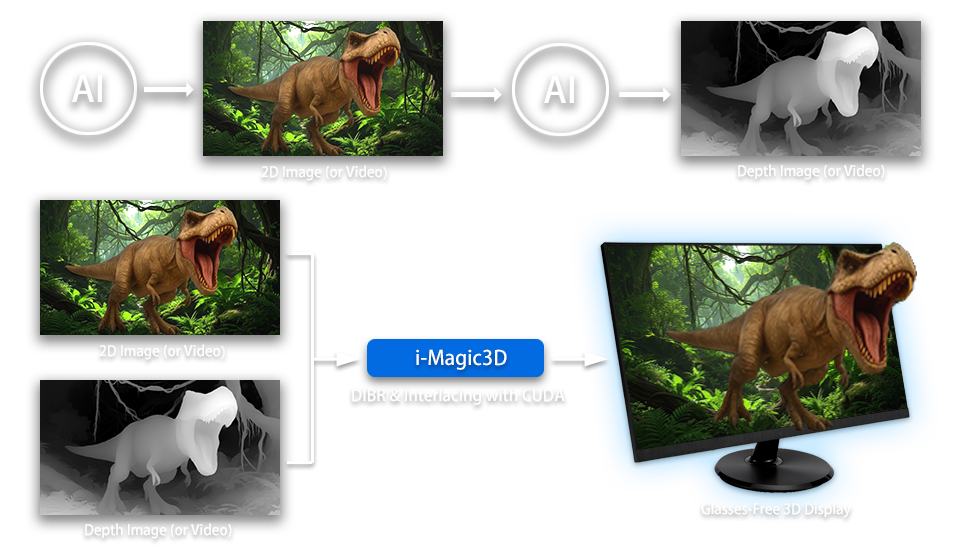
This is the most cost effective way to get the multi-view images for 3D lenticular allpications. Nowadays, we can easily convert any 2D image into Depth Map with Photoshop, Generative AI tools like Depth Anything V2, Video Depth Anything, Quick Depth 3, Depth Scanner, ...etc. Once you have Depth Map, then you can render it into multi-view images as required, or render "Multi-View Interlaced image Sequence" for further production of MP4 videos with i-Magic3D's DIBR.
1. "Multi-View" and "Multi-View Interlaced image Sequence" Rendering
Supports 2D/Depth, 2D+Depth (Side-by-Side) image and 2D/Depth, 2D+Depth (Side-by-Side) MP4 video.
2. "Multi-View Interlaced image Sequence" Rendering
Product Features:
- Supports more than 100 frames of depth rendering for 1920x1080 pixels of resolution.
- Supports to directly render 2D/Depth MP4 video into interlaced image sequence.
- Supports "Optimize Depth Map" to fully spread the gray scale of depth map.
- Supports "Expand Depth Edges" to eliminate the burr caused by poor quality of depth map.
- Supports "Histogram" to inspect the quality of depth map.
- Supports "Invert Depth Map" for different formats of depth map.
- Supports "Preview on Display" to secure the DIBR quality before depth rendering.
- Supports batch processing of image sequences.
- Supports high-speed "DIBR" and multi-view interlacing with CUDA.
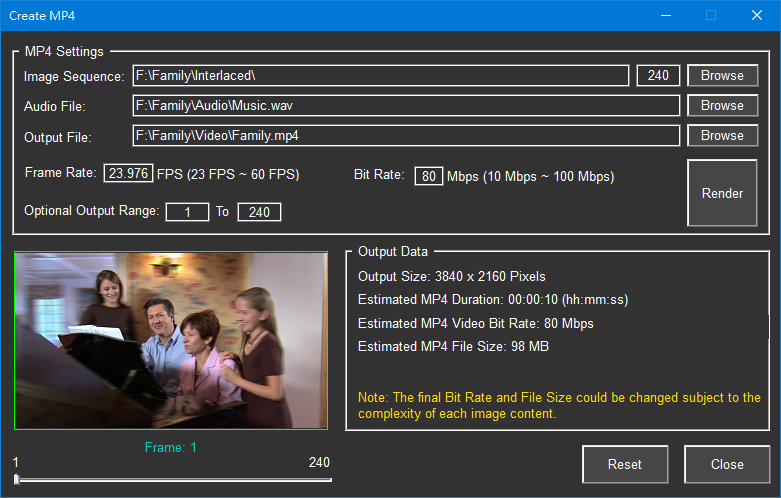
Create MP4:
When the environment for "Glasses-Free 3D Display" is completed, the ultimate goal is to be able to play multi-view 3D images and videos. Here, i-Magic3D provides a simple and easy way to create MP4 videos. The completed "multi-view 3D" interlaced MP4 videos can be directly played and displayed on the AMOLED/OLED/LCD panel using Media Player Classic - Home Cinema (MPC-HC) in Windows, or It can be played and displayed directly on Android and iPhone mobile phones, without the need to use dedicated 3D playback software. This method of interweaving multi-view images into MP4 videos in advance can effectively solve the problem of reduced 3D resolution caused by "Multi-Tile" playback display, and can also solve the problem of "2D+Depth" video real-time computing capability issues in rendering and interlacing multi-view images.
Product Features:
- Supports the production of multi-view interlaced image sequences of any resolution into high-quality MP4 videos.
- Supports adding MP3 or WAV audio to MP4 videos.
- Supports any AMOLED/OLED/LCD Monitor/Laptop PC/Tablet PC/Smart Phone/ ... etc.
- Any Frame Rate can be set.
- MP4 compression quality (Bit Rate) can be set.
- MP4 output range can be set by "Optional Output Range" .
System Minimum Requirements:
- Intel Core i7 with 4 cores / 8 threads 2.5GHz (equivalent or higher)
- System RAM 16GB (or more)
- Display Resolution 1920x1080 Pixels (or above)
- nVidia graphics card GeForce GTX 950 (or above)
(Note: In order to use CUDA for high-speed DIBR and interlacing to produce MP4 videos, it must be installed!) - AMOLED/OLED/LCD Panels: AMOLED/OLED/LCD Monitor/Laptop PC/Smart Phones, ...etc.
- Media Player Classic - Home Cinema (MPC-HC) MP4 Player
- Windows 10/ 11 (64-Bit)
Trial Version:
Link1 Link2 Link3- Product Contents: Portable Version, Encrypted Software (including one password for one PC use)
- Unit Price: $1,650 USD
Notice:
Before you order, please make sure that you have fully tested the software. Once you have purchased it, there are no refunds.
Order:
1. Purchasing with Tele-Transfer via bank:
- Bank Name:Bank of Taiwan, Peitou Branch
- SWIFT CODE:BKTWTWTP036
- Bank Address:No. 152, Sec. 1, Chung Yang S. Rd. Peitou Dist., Taipei, Taiwan
- Account Name:i-Art 3D Ltd
- Account Number:036-007-064553
2. Purchasing with PayPal or Credit Card: